A blog to share all things craft-y....crafts, home decor, sewing, party decor, diy projects, garden ideas, and various other adventures in creativity. We're glad you stopped by!

Thursday, December 8, 2011

A Frame for My Christmas Cards

Hello Followers! I'm back to the living!

Well, technically I never left the living....but I was very sick and just barely surviving the work day before coming home to crash in bed, then get up the next morning and repeat the process all over again. There was absolutely zero energy for crafting or blogging or anything else fun!

Being pregnant does that to this girl.

That's right. My little family of three is expected to expand to four in early June and we are ecstatic about it.

I'm finally out of the torturous first trimester and am getting some energy back and thanks to the miracle of Zofran not so nauseous all the time.

So, now that I'm feeling better I decided to pull out some random supplies to make a frame for holding the many Christmas cards I'm anticipating receiving this Christmas season.


I pulled it all together in about 30 minutes using an antique store frame, leftover paint used for the trim in our house, acrylic paint and glaze, and clearanced ribbon. Cheap this project definitely was!

The frame is 23"x35" and I purchased it for $1.00 at an antique store in a nearby town. I painted it white using leftover paint from when we painted the trim in our house last spring. Next, I taped the ribbons to the back and got them laid out the way I wanted. After confirming I liked the lay out of the ribbons I hot glued the ends to the back of the frame.

Then, after putting it on the wall and deciding I hated the crisp white frame with the goldish-brownish ribbons I took it back down and glazed over the white with a mixture of equal parts FolkArt Coffee Brown acrylic paint and Americana Staining Antiquing Medium. I painted it on and then wiped it back with a rag according to the instructions on the stain bottle.


I L-O-V-E the result. The glaze was definitely a good call.

So, how about you? What creative ways do you display your Christmas cards?

I hope the Christmas season isn't making you too crazy and that you all aren't putting too much pressure on yourselves with all the homemade goodness I'm sure you're whipping up. And, I speak for myself too when I say that! :-)

Linking up to these great parties!

Monday, September 5, 2011

Fall-ish Fabric Burlap Wreath

Fall-ish. Because Fall-ish is a word ya know. ;-)

Fall. Blogs have been talking about it coming for weeks. I refused to acknowledge any sense of a fall season until our temperatures dropped below 100. Well, guess what? They finally have! A cold front moved in Saturday and with it lows in the 60s and highs in the upper 70s. Absolutely gorgeous is the only way to describe the past two days. It definitely feels like Fall and to celebrate we spent a lot of time outside this weekend instead of inside. It was glorious.

So, today I have a burlap covered wreath to share with you that I made as a gift for a soon to be cousin in law. Burlap always reminds me of Fall. Actually to be more exact, it always reminds me of scarecrows, which makes me think of Fall. The fabric I chose for the pennants has some great fall hues too.

To create this wreath, I purchased a straw wreath at the dollar store and hot glued burlap around it. Then to embellish the wreath, I whipped up a small pennant banner, some fabric rosettes, added a couple of vintage buttons (that I wish I'd gotten a better close up of), and the monogram S, because her last name will soon begin with the letter S.

There she is. Easy-peasy!


In the center of the blue rosette is
one of those cool vintage buttons.


Pretty sure I'll be using the pennant fabric soon for some projects to keep.


So, what about you? Has Fall arrived where you live yet? I hope so. And, I hope you'll enjoy plenty of mild temperatured days before Winter arrives!

I'll be linking up to these fabulous link parties this week. Hope you have some time to check out all the other cool fall projects going on!

And, this party...which requires a direct link.

Thursday, September 1, 2011

The Rest of the Bridal Shower Decor

Happy September fellow crafters! I cannot believe September is upon us. Soon I'll be diving into fall decorating. I'm two weeks into school and it's taking me a bit figuring out the balance between my school duties, home duties, and finding time to craft blog. My apologies up front if the posting is a little sporadic!

I'm combining the rest of the bridal shower decor I used for my soon to be sister in law into this one post. I've shared before about banners, guestbooks, and towel cakes, so I'd hate to bore with you with three separate posts on the same things!

I thought this bridal shower round they turned out even better than before.

First up....the banner.

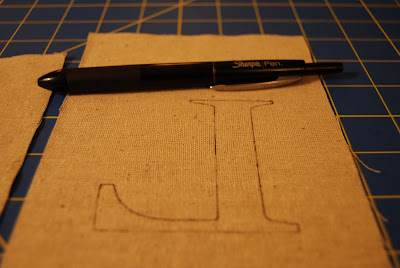
I used muslin for the stenciled letters and then glued a dark teal fabric behind the muslin. I put my Silhouette to good use creating the stencils to trace on to the fabric and then hand cut each letter. I topped off the banner with a satin lime green ribbon. It definitely looks more amazing in person. Lime green can come off kind of weird on different monitor resolutions.


Here are some close up shots of the process and the individual pieces.


The muslin I cut at 5"x7".

The teal fabric I cut smaller at 5"x6".


Traced the stencils on backwards on the back side of the muslin.

There's the letter all pretty and cut, no black ink.

I sprayed the back side of the muslin with elmer's craft bond glue,
and then (very carefully) placed the teal fabric on the muslin.

I used a vintage pearl button in the center of the teal rosette.

Second up....guestbook.


The rings and Guestbook are scrapbook stickers.

I purchased the book of plain white pages at Hobby Lobby in the scrapbook album section for $3.00 during a half off sale. The last guestbook I made myself. Purchasing a plain book and decorating it is WAY easier.

Third, and finally....the towel cake. This was my FAVORITE piece at the shower. The white towels just looked so good with the dark teal and lime green accents. And, I got to use a vintage clip on earring which I've been wanting to incorporate into a project for a while now.

I clipped a vintage pearl earring on the black rosette.
It is by far the coolest element of the whole thing.

I'll be linking up to these great parties this week. Go check 'em out. Plenty of great ideas out there to see!

Sunday, August 21, 2011

Bridal Shower Table Decor

Like I mentioned in my last post, I had the opportunity to create decorations for my soon to be sister in law's bridal shower a couple weeks ago. Today I'll be sharing with you some of my table decor for the shower.

Blue Mason jars are super popular right now and for good reason. They are super cool! And, they are incredibly versatile. For the table decor I used them as vases to hold painted corkscrew (or curly) willow tree branches.

The bride's color choices are dark teal and lime green. To bring in the green I purchased some spring branches from the Hobby Lobby floral department and also used a couple of green vases for the bride's table.

I began with these jars....

....and these curly willow tree branches.
(I picked mine up off the ground at a local park.)

Then, I painted all of the branches using some left over white paint.


Once the branches were painted I bunched them together and tied them with jute before placing them in the jars. I didn't like the way the branches were leaning to one side or another, so I filled the bottoms with glass rocks to stabalize the branches.


Paired with a lime green photo cube.
Perfect.


I received lots of positive feedback at the shower with how the jars turned out, but I really wish I'd had more jars to use! I've been slowly collecting them over a couple of years and the prices are only going up thanks to their recent rise in popularity. I paid anywhere from $4 to $12 for the jars. I would consider anything in the $5-$7 range a fair price depending on size and whether it has its lid or not. However, I may have to soon adjust that number because at most antique stores I see them at they begin at $8 for the smaller jars and go up from there. I've found that estate sales are the cheapest places to find them, but they don't usually last long before someone's snatched them up.

So, what do you say? Have you done anything cool with blue Mason jars recently? I'd love to see your projects if you have!

I'll be linking up to these great parties this week. Go check 'em out!

Thursday, August 18, 2011

Significant Dates Frame

Whew! It's been a whirlwind two weeks. Last weekend I helped host a bridal shower for my soon to be sister in law and then Monday I returned to my teaching job. There have been some extra challenges in getting my room in order this year due to construction in our building, so it's meant extra long hours for me this week and little posting. :-(

The good news is my room is pretty well back in order and I think I'll have the time to begin posting weekly again (maybe even twice a week!).

While perusing Pinterest a while back I came across a framed page of dates. Guessing based on the order of dates and proximity of years I think it was a list of birthdays for the family. I loved the idea and tweaked it a little to create a fun gift for my brother and soon to be sister in law. I also used the framed page of dates as decoration at her bridal shower. I'll be sharing lots of her decorations here in later posts.


Here's a shot of the final project.

It probably doesn't need step by step instructions but I'm-a-gonna give 'em to ya anyway! :-)

Supplies:
8 1/2 by 11" Raw wood frame (bought mine at the Dollar Tree---where's everything's a $1!)
Acrylic paint
Glaze or antiquing medium
scrapbook paper
color printer
Microsoft Word (or something similar with text tools)
sand paper (optional)

Step 1:


Paint...

the...

frame in a color of your choosing.


Step 2:

Mix a top coat color with your antiquing medium.
Or, just use a glaze.
Paint the frame again.
Somehow I didn't get a picture of the frame after this step...

Step 3:

Open a new Word document (or any software with text options). Word was easy to use because it centers the lines perfectly for an 8 1/2 by 11" paper. For the dates I used their birthdates, first date, engaged date, and wedding date. I typed them up in a fun font and used colors that coordinated with the decor of their living room. Then I printed the letters on a cream colored 8 1/2 by 11" piece of cardstock.

Step 4:


Frame and enjoy!

Like most craft projects this one is totally customizable and it's definitely got a personal touch! And as an added benefit, very inexpensive to make. Hope you find some inspiration from it!

I'll be linking up to these parties this week! Be sure and check 'em out.

And this link party which requires a direct link.

Monday, August 8, 2011

A Mailbox Makeover

This week's project isn't my typical craft project. My brother brought this one to me.

He works for a farm in my home community and decided the mailbox was in dire need of a makeover. He heard that I recently purchased a Silhouette and enlisted my assistance to get 'er done.

First he sandblasted the mailbox (I have no idea what this entails..it's just what he told me before he brought the mailbox to my house and dumped sandblasted dust all over my floor...I recommend cleaning out the dust before bringing it inside to work on ;-D).

Second he coated the box in John Deere Green and the lid in John Deere yellow. They actually sell licensed John Deere green and yellow at hardware stores. Who knew?! Not me, obviously.


Then he showed me a few graphics on the Internet he wanted to use on the mailbox for stenciling. I took the graphics and convered them to Silhouette shapes and after several rounds of using the lightest paper on the stickiest mat, I finally switched to a poster board material and was able to make some solid stencils without ripping it upon pulling off the Silhouette mat.


Tip for converting graphics to Silhouette shapes....the graphics with the simplest lines and fewest colors are easiest to convert.

We used a stencil adhesive on each of the stencils to adhere them to the mailbox and then taped around them to limit overspray.


It looked super sharp and those numbers are the house numbers. Don't they look just like a tractor serial number would? I thought it turned out awesome.

And, here's a few pics of the final product on its post at the farm.


The owners were stoked to have it and it was fun to make!

Linking up to these parties this week!

Friday, July 29, 2011

Table Love for My Craft Room

In my house we have a unique (as in no heat/no ac) bonus room that leads to our charming (in other words...tiny) back deck. For most of the five years we have lived in this house it has been the "dog room". The place our two dogs would go when we weren't home, or had company over, or had inclement weather and they couldn't be outside.

Well, both dogs are gone now. So I have officially claimed it as my "Mom Cave" aka "the craft room". I cleaned it from top to bottom (literally) and I've thrown up a couple shades of gray on the wall to test out paint colors. I've chosen one, but haven't made it a priority to get to the store to purchase the two gallons it's going to take to do the whole room.

I have been scouring Craigslist and estate sales all summer looking for the perfect table for this room. I'm pretty sure I found the perfect table on Craigslist...but we couldn't agree on a price so I walked away. The table was an old Duncan Phyfe table with a leaf. The thing I loved most about it was that I could fold it down and tuck it against a wall for more space in the room if I desired it or open up both ends and put a leaf in for larger projects. I still might buy that table.

But, I digress....

So, as I was saying... I've been scouring Craigslist and estate sales and today I came across this fabulous set at an estate sale. There were four awesomely stylish chairs (one has a broken leg my husband promises he can fix). The fabric on the chairs has either been recently reupholstered or just incredibly well kept, or I suppose it could have also been just rarely used. The large hexagonal table is in perfect shape for its apparent age. The wood on all of the pieces is in terrific shape, except for that one chair. I was thinking I'd buy an old table and have it be a fixer upper, but I'm pretty sure I won't be painting this one any time soon. And, the best part about this table set? It was day two and this particular estate sale broker does half day prices on the last day. Lucky me!


Seriously the most comfortable chairs.


I paid $60 even for these beauties. So, what do you think? Did I score a good deal?

I'll be sharing more of my craft room as it comes along in the next couple of weeks. And, I'm linking up to this "What I Found Friday" link party over at Vintage Revivals. I thought I had a bad obsession with buying old, used, worn furniture. Then, I discovered Mandi's blog. I'm way overmatched against her! So, go check out all the other cool stuff!

We Can Do Hard Things Muslin Banner

Well, after another unsuccessful attempt at painting the wooden plaque I finally gave up and moved on to a different medium. I imagine I'll go back to it later, because I still think it has great potential. I've just got to figure out the right method for painting. Live and learn right? :-)

Truthfully, every time I make something I feel like I go from seriously inexperienced crafter to at least a novice crafter. Generally, when I finish a project I'm ecstatic to have 1) finished it. and 2) stoked it actually turned out good enough to actually give to someone. They're never perfect, but I've not once yet had a recipient turn their nose up at my work. At least not to my face anyway.... Haha!

The project I'm sharing with you today is my fourth rendition of a muslin banner and I think my best yet. I'm getting more and more comfortable with my sewing machine, which I've only been using for a few months. And, I'm still pretty obsessed with the ease of fabric rosettes, so of course those are included too. And, for this project I got to play around with my Silhouette some more. It's getting a lot easier to use. And, I've learned there are two different levels of sticky on the mats. I was using the very stickiest with the lightest paper. Whoops.

Some very good friends of ours are packing up and moving eleven hours south. They've no doubt got some trials ahead of them, so I thought by making this banner I could encourage them in knowing they "can do hard things". I presented it with a letter about all the things I admire about them and it was the perfect going away gift and something they can use in their new home.


I started out with a large piece of muslin (14" x 40").

Then, I designed a stencil on my computer and used cardstock to cut out the stencil. So that the stencil would stay on the fabric as I painted, I sprayed a little stencil adhesive on the back. You can find these little aerosol cans in the stencil section of major craft stores. It worked perfectly. There was zero moving around and zero leakage around the letters. I folded the piece of fabric in half before I placed the stencils and then stuck a sheet of freezer paper between to keep the paint from bleeding though to the back piece of muslin. Because I started painting at midnight, I just allowed the paint to dry over night. I used a cheap acrylic paint, so if it had been the middle of the day, I'd have given it an hour and then went to work sewing.

The next morning I folded the fabric the opposite direction (so that the paint is on the inside) and then sewed up the three open sides being sure to leave a two inch gap so I could turn it right sides out. After turning it out I folded the top over approximately two inches and sewed a fun zig zag stitch across the top to make the loop to hold the dowel rod. Be sure and back stitch a teeny, tiny bit on each end so it won't unravel over time.

Done and...

...done.

Or, not....

It just looked unfinished to me.
So, I added a grouping of fabric rosettes.


Ahhhh....much better.


So, what do you think? Have you used this "we can do hard things" phrase with any of your projects? Be sure and leave a link if you have. I love seeing how others incorporate it into projects.

I'll be linking up to these great parties this week. Check 'em out!

Hope you all have a GREAT weekend!

Friday, July 22, 2011

Wedding Shower Banner

This post is not what I had originally planned to share this week. I had wanted to share my super awesome "We Can Do Hard Things" plaque I made. But, getting the words stenciled on has become a major craft fail. It has been one disaster after another. I'm using a silhouette to cut a stencil but when I used freezer paper and tried to create a temporary adhesive using Elmer's craft spray adhesive the glue stuck to the painted wooden plaque when I took the paper off and the stencil paint bled right through the freezer paper and the letters turned out terribly! So, I sanded the whole thing down, repainted and am trying to find a good solution for my stenciling dilemma. I thought about cutting the design out on cardstock with the Silhouette and then just mod podging that to the plaque but the Silhouette keeps ripping the cardstock around the letters instead of cutting a clean line. Any help or blog post suggestions would be awesome!

Here's my back up post....

This banner went along with the towel cake and guest book I shared here and here for a wedding shower I helped to host.

I cut coordinating fabric into triangles and hot glued them to grossgrain ribbon. Done and done!


I hope all of you are having a better crafting week than I am! :-)